VY S2 / VZ Calais 8 Way Memory seat into VY S1 Berlina
So with the help of one very friendly and helpful person I have worked out how to install VZ Calais 8 Way Memory seats into a S1 VY Berlina without the memory and I figured I would do a write up in the hopes that it can help others.
Please note: This method removes all of the memory functions as wires need to be cut and removed in order for the 8 way controls to work alone.
Step 1. Remove your seat and seat side trim from the seat base / rail. You will need to remove the spring at the front left of the rail and then remove the earth wire which is a single black wire going from the seat base to the rail.
Step 2. Unplug all the connections / plugs from the motors and the 8 way control module, Memory Button Control Module plug and also the extra white seatbelt plug, you may find that the slide / rail motor plug is hard to remove, no problem just leave it plugged in.
Step 3. Grab the plug and wires which plugs into the 8 way control module, come back from the plug about 10-15 cm and cut off all the wires from the memory plugs.
Step 4. Grab the plugs that go into the front and rear Motor and do the same thing but get as much length as you can cutting it off the memory plugs.
Step 5. Grab the white plug that goes into the back rest (NOT THE YELLOW / ORANGE AIRBAG PLUG), should be a white plug, do the same allowing yourself as much length as possible.
Step 6. You should now be left with only the plugs pictured below in Photo “Plugs” which are 1x Front Motor Plug, 1x Rear Motor Plug, 1x Backrest Motor Plug and if you could get it off, 1x Slide / Rail motor plug otherwise it will be there just not removed.
Step 7. You can now put all the memory function wiring aside as none of it is needed for the 8 way controls and motors to work alone but dont throw it out as it can be used to extend the Power and Earth later on.
Step 8. Grab just the plugs that power the motors (NOT THE 8 WAY CONTROL PLUG YOU NEED ALL THEM WIRES INTACT) so 1x Front Motor Plug, 1x Rear Motor Plug, 1x Backrest Motor Plug and 1x Slide / Rail Plug and remove ONLY THE SMALL WIRES that connect to the memory plugs, if you are unsure of which wires to remove refer to the Loom and look at the X’s on each plug.
Step 9. Now strip back all the ends of the remaining wires as they all need to be connected to one another using the Loom diagram that I have made below. Remember to extend the Power and Earth and either put a new Plug on the end or hardwire it in later when you are ready to test it all. (I hope the diagram makes sense, I figured if any of the wire colours are different that the locations of each pin and function will remain the same so follow the numbers if that is the case.)
Step 10. You may notice that there is an extra loom and plug that comes from the seatbelt which should be a white plug, I would not worry about cutting this, I just simply taped up and heat shinked the end of the plug.
Step 11. This step is only required if your wires are to short. You may have to extend some of the wires if they are to short, the only wires I had to extend were my Power and Earth as they did not reach right back and I wanted peace of mind that they had enough slack to not be pulled tight when the seat is in motion.
Step 12. You can now Run the wires / plugs through and under / alongside the seat rail to their required motors making sure they are taped up and out of any pinch zones of the seat hinges / rails.
Step 13. Now is the time to plug back in the 8 Way Control Plug back into the 8 Way Control Module and then plug the Power and Earth from the 8 Way Control Plug into the Car Plug Power and Earth, test that each motor is going in the correct direction corresponding to which control is activated, if all good proceed to next step.
Step 14. You can now put the seat back onto the Seat rail / base remembering to plug in the Backrest motor plug and the Earth from the Seat back into its place on the rail / base then do the same for the spring at the front left side of the rail, you can now test the backrest motor and if it reclines back and forth then you are all good to go.
Step 15. Place the seat side trim back on and screw it back once again making sure all the wiring is taped up and out of the way of any pinch points in the rails hinges.
Step 16. Leave your battery disconnected for 30 minutes or so then recconect the the SRS Airbag plug and Seatbelt Plug then replace all the surrounding seat trims making sure again that no wiring will get caught / snagged on the trims when the seat is in motion.
Step 17: Sit and Enjoy your 8 Way VZ Calais seats in your VY S1 and maybe even VT VX aslong as it has a 2 Wire Car Plug.
If anyone has any troubles don’t hesitate to message me and I can try to help as best as I can.


Holden Commodore VE Series 1, 2006 – 2007
E38 – VZ & VE Holden Commodores with the L76 and L98 V8
Hardware/Service # (12597 121) – Silver Throttle Body
other service numbers 12597121, 12603892, 12589297, 19210738 that can be used to replace the 121
System OS# 12612381 & 12624402
Calibration#
Holden Commodore VE Series 1, 2006-2010 – 6.0L V8 – Throttle body and ECU part number notes before you start
3) E38: Keep to flashing files from these year groups to the service numbers listed:
wire harness Same on a) b) c)
Initial Repairs to vehicle
So your typical commodore having the fault light on and P0009: Engine position sensor bank 2 fault is displayed,
Read Morethe 2 fault codes present every time after we scanned this vehicle was
Engine ECU
p0850 – Park/neutral signal Circuit Incorrect.
Audio System
(fixed this one too)
B101d-3c – Ecu, Hardware Performance fault.
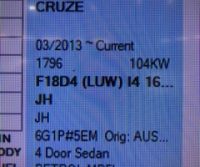
Round 2. This week for the fault code P0016 this time on a F18D4 Holden Cruze, the vehicle came in with lack of power and struggled to idle,
Read More
Vehicle
Holden Captiva series 2, 2011, 2.4L 4 cylinder engine.Symptom
Vehicle came in with check engine light on and complaint was, that the engine was shaking when idling after going for a drive, he left the vehicle sit over night at home drove the next day and no issues after leaving it over night.Being that the engine light was on the instrument cluster we connected the scan tool and conducted a test drive.
Read MoreSecurity lockout active, vehicle data mismatch
Here’s what you have to do, this is when radio is the same Read More
A client came in this week, for us to program a new remote,
we used the Tech2 system to program, we looked under 2005 rodeo there was no car made in that year, The vehicle looked like an RA rodeo,
We found that using the ANTI THEFT SYSTEM with a 2000 model jackeroo, just like the TF rodeo,
you will need to immobiliser code and then you can follow the steps to program remote.
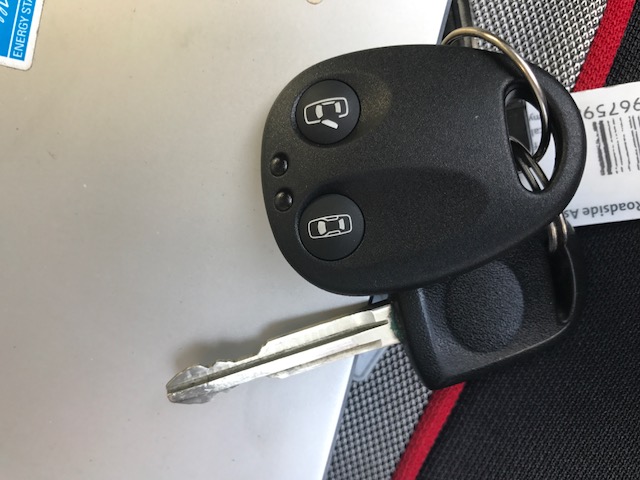
RA Rodeo, remote type for programming
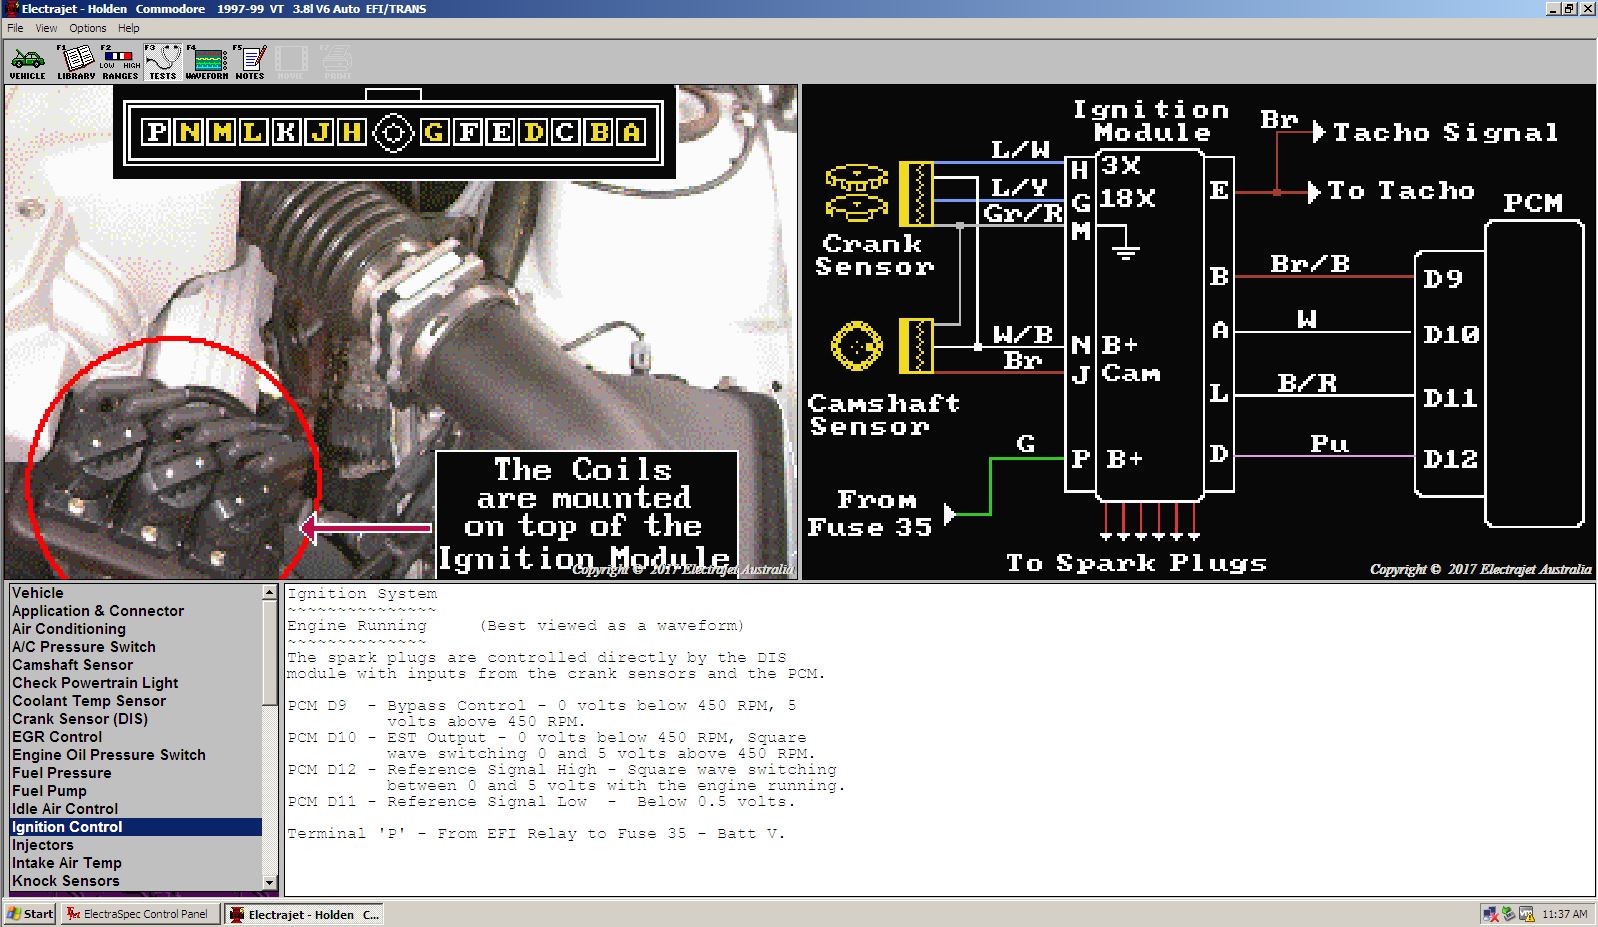
it is so often that i look for this i thought it would be easier to find it online the next time i need it
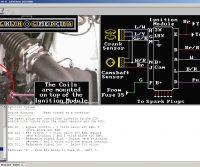
so here it is VT-VX DFI module wiring and harness plug pin outs
Products
-
 Holden ECU Programing - VIN Changing - Tuner Unlocking
$150.00
Holden ECU Programing - VIN Changing - Tuner Unlocking
$150.00
-
 Battery's From $135
-
 P & G Work Shirt Pit crew Style
$25.00
P & G Work Shirt Pit crew Style
$25.00
-
 F150 Raptor KMH Speedo overlay
$115.00
F150 Raptor KMH Speedo overlay
$115.00
-
 MAZDA ROTARY BOSCH ALTERNATOR HIGH OUTPUT 110 AMP
Original price was: $455.00.$400.00Current price is: $400.00.
MAZDA ROTARY BOSCH ALTERNATOR HIGH OUTPUT 110 AMP
Original price was: $455.00.$400.00Current price is: $400.00.